Thursday, December 22, 2011

Sweet Memories

One of my fondest memories of Christmas of years past is of my grandmother. She lived nearby and was an important part of our life. My grandfather died when she was 70 and she lived independently in that same house for another 28 years. She loved to bake and help others.

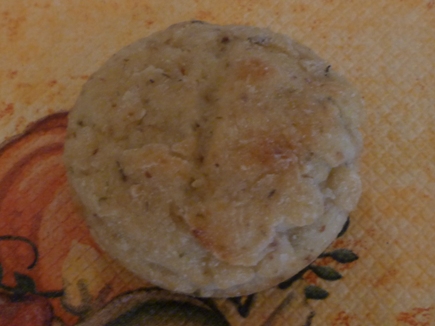
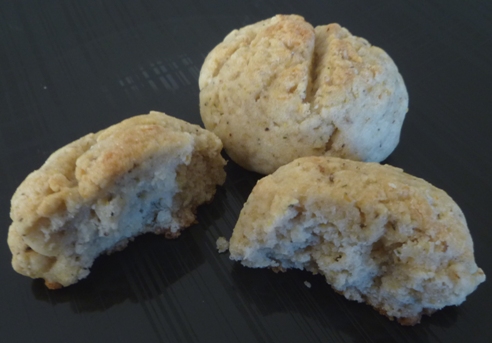
I specifically remember enjoying her "Mexican Wedding Cakes" (or melting moments) around the holidays. They were covered in a gummy powder sugar layer and melted in your mouth. She gave me the recipe and explained that she shook the cookies in a bag of powder sugar twice. Once when they were still warm and once after they cooled. Yum!

In honor of my grandmother, I here is my gluten and dairy-free version of her wonderful holiday treat.

                                                                                  Print Recipe
Grandma's Mexican Wedding Cakes

1/2 c. plus 2 T. brown rice flour
3 T. cornstarch
3 T. potato starch
1/3 c. powdered sugar
1/2 t. zanthan gum
pinch baking powder
1/3 c. dairy-free margarine
1 t. vanilla
powdered sugar or frosting   

Whisk dry ingredients together in a small bowl. In a separate bowl cream margarine with vanilla. Work in dry ingredients until completely mixed in. Form 1 inch balls. Place on ungreased cookie sheet 2 inches apart. Flatten slightly and bake at 350 degrees F for 10 - 12 minutes or until cookies are very lightly browned on the bottom and set. Cool until cookies are just warm not hot to the touch. Put about 1/3 c. powdered sugar in a plastic storage bag. Shake 2 - 3 cookies at a time in the bag to cover with sugar. Repeat again after cooled. If desired, frost instead. Cookies keep covered in a cool place for 2 - 3 days. Freeze any leftovers. Makes 14 - 16 cookies.

Remember, if you don't have a lot of GF cookie recipes for the holiday, it's easy to make different versions of your favorite recipes. Make meringue cookies with different shapes and colors like candy canes, put toppings or sprinkles on brownies or use nuts, jellies and chocolate to spruce up your sugar cookies. Be creative and have fun.

Merry Christmas and Happy Holidays to all!


Saturday, December 17, 2011

Go Nuts!

I am always looking for fun and easy things to make around Christmas time. This year I made flavored nuts for the holidays. Not only are they simple, tastey and a great gift, but my kids love to eat them as a treat while still getting the nutrition of the nuts.

Cranberry Orange Nuts           Print Recipe

2 3/4 c. nuts (almonds, pecans, walnut chunks)
1/3 c. coarsely chopped dried cranberries
1 egg white
1/3 t. orange oil
1/2 t. vanilla
1/4 + 2 T. sugar
1/3 t. salt
1/3 t. cinnamon

Put nuts and cranberries in a large bowl. Whisk egg white in a small bowl until bubbly. Whisk orange oil and vanilla into egg white. Pour over nuts and stir until coated. Mix sugar, salt and cinnamon in another small bowl and pour over nuts. Stir until all nuts are coated.

Spread in a large, greased (oil spray or dairy-free margarine) cookie sheet with sides. Bake at 300 degrees for about 30 minutes, stirring every 10 minutes, until well toasted and dry. Cool and store in an airtight container.

Notes: If you like your almonds toasted more, toast them for an extra 5 - 10 minutes before making the recipe.

Simply delicious!

Saturday, December 10, 2011

Make Mixes For Christmas

A very easy and thoughtful gift for Christmas is a mix for a favorite recipe such as muffins, cookies, pancakes, etc. It's especially nice for those who are gluten-free since mixes can be so expensive and yet so convenient. You can layer it in a jar if it has different color and texture ingredients that you will be able to see or just mix the dry ingredients well and put it in a bag. I like to use a sealed sandwich or quart bag and put it in a cellophane bag that I can tie with a pretty curled ribbon. Don't forget to include a cute hand written or computer made tag that gives the directions of what to add and how to make the item.

A favorite mix of mine to give this year is my pancake recipe using the buckwheat flour where it gives a choice, adding 1 T. extra brown sugar, using the 1 t. cinnamon, and adding 1/3 c. of both finely chopped dried cherries and pecans. The receiver only has to add the liquid, eggs, vanilla and oil.

Simple, tasty and fun for the holidays!

Wednesday, December 7, 2011

Simple Traditional Sage Stuffing

I read somewhere that all you have to do is change the bread to gluten-free to make stuffing gluten-free. We wanted some for Thanksgiving, but wanted to make it like my mother's recipe.

I tried it (and changed the butter, too). I couldn't find bread crumbs, so I used a loaf of Udi's whole brain bread, chopped it into 1/2 inch cubes and toasted it in the oven at 250 degrees until it was dried out. It took about an hour stirring every 10 minutes. The flavor of the stuffing was fabulous, but it was a little dry even though I put in extra broth.

So, here is the adjusted the recipe. It goes nicely with turkey, chicken or pork. If convert your favorite recipe, you may need extra liquid.


Traditional Stuffing                        Print Recipe

1/2 c. finely chopped onion
3/4 c. finely chopped celery
3 T. ghee or dairy-free margarine
6 1/2 c. dried gluten-free bread cubes (1 loaf of Udi's whole grain bread)
1 1/2 t. sage
1/4 t. salt
1/8 t. pepper
1 3/4 - 2 c. gluten-free chicken broth

Saute onion and celery in ghee or dairy-free margarine for 5 minutes or until tender on medium heat.

Mix bread cubes, sage, salt and pepper in a large bowl. Stir in onion mixture. Pour broth over bread crumbs and mix until moistened. Put in greased casserole dish, covered, and bake at 350 degrees F for about 30 minutes or until heated through. Leave cover towards the end of baking if you like a crunchy top.

This recipe can be dairy-free if you use dairy-free margarine. If you are just concerned about casein or lactose and are not familiar with ghee see link for ghee.

I think the flavors of the gluten-free bread really added to the overall flavor of the stuffing. I took it to our extended family Thanksgiving gathering and brought the dish back empty. Yum!

Wednesday, November 30, 2011

Gluten-Free Muffins for the Season

One of my favorite flavor combinations for sweet bread is orange cranberry. Since it's around the holidays and fresh cranberries are plentiful, it's the perfect time to make orange cranberry bread or muffins. I like to put my gluten-free sweet bread in muffins because it's handy for lunches and snacks and seems to bake well using small portions of dough.

I created this recipe after working with a banana muffin recipe mentioned in a previous post. I like using brown rice flour without the starch flours because it increases the nutritional values of the recipe. I changed the flavors and liquid part of the recipe.


Orange Cranberry Muffins/Bread                          Print Recipe

1 1/4 c. brown rice flour
3/4 t. GF baking powder
1/2 t. baking soda
1/8 t. salt
1/3 t. zanthan gun
1/4 t. cinnamon

2 eggs
1/2 c. sugar
2 T. brown sugar
1/4 c. oil
3/4 c. applesauce
3 T. orange juice concentrate
1/2 t. GF vanilla

1 1/2 c. coarsely chopped cranberries

Grease 12 muffin cups or papers with oil. Preheat oven to 350 degrees F.

Whisk first six ingredients in a bowl. In a separate bowl, whisk eggs. Add sugars, oil, applesauce, concentrate and vanilla, whisking after each addition.

Stir in dry ingredients just until mixed in. Fold in cranberries. Spoon into muffin tin. Bake at 350 degrees for 18 - 21 minutes or until lightly browned and toothpick inserted in the middle comes out clean. Move to wire rack to cool. Refrigerate or freeze.

Enjoy and share!


Easy Cherry Pecan Chicken Salad

When you are wondering what to do with leftover chicken or turkey, here is a tasty yet simple way to make chicken salad with a hint of citrus. This is a very easy recipe to adjust with more or less dressing, fruit, etc. to make it how you like it. Yum!

Cherry Pecan Chicken Salad                                 Print Recipe

1/4 c. plus 1 T. mayonnaise
1 1/2 T. orange juice concentrate
1/4 t. basil
1 1/2 c. of cooked and diced chicken or turkey
2 T. chopped dried cherries
2 T. chopped pecans, toasted if desired
2 T. finely chopped celery
dash of salt as desired

In small bowl, combine mayonnaise, concentrate and basil. Mix until smooth.

In a medium bowl, combine remaining ingredients and mix. Pour dressing over and stir until all ingredients are covered.

Enjoy with greens as a salad or on a sandwich. If preferred, mix together all ingredients together except for the chicken and spread over slices of meat on a sandwich. Serves 3 - 4.

Wednesday, November 23, 2011

Gluten-Free Thyme Rolls For Thanksgiving Trial #4

The fourth trial is a winner! Though still heavier than a regular roll, it has a flavor that my family likes, it has a shape that I like, and it did raise well. I will continue to work on this recipe, but this is the roll I made for Thanksgiving this year. The first time I made this version of the recipe, the dough was a little stiffer. If you want your roll to have a little more formed, rounded shape, use medium sized egg whites or a T. less water. The roll will be a little more dense also.

Gluten-Free Thyme Dinner Rolls                          print recipe

1 package of yeast (2 1/4 t.)
2 T. sugar
3/4 c. water (110 degrees)
2 egg whites
3 T. olive oil

3/4 c. brown rice flour
1/4c. plus 2 T. potato starch flour
2 T. cornstarch
2 T. almond flour
1/4 c. and 2 T. quinoa flakes
1 1/2 t. thyme
2/3 t. salt
2/3 t. baking powder
1 t. zanthan gum

Proof the yeast by mixing the yeast with 1/2 c. of the warm water and 1 t. of the sugar. Place in warm area to raise. It should almost double in 5 - 10 minutes if the yeast is working well.

Meanwhile, combine remaining sugar, all flours, cornstarch, quinoa flakes, thyme, salt, baking powder, and zanthan gum. Whisk dry ingredients until combined well.

Whisk egg whites in separate bowl until bubbly. Add yeast mixture, remaining water and olive oil and mix well. Whisk, stir or beat in dry mixture until combined well. Dough will be sticky. Cover with greased plastic wrap and let raise in warm area until doubled - about 1 hour.

Divide dough into 8 - 12 equal pieces. Use rice flour to help roll dough piece in a ball. Place each ball in a greased muffin tin. Make a small slit on the top of each roll with a sharp knife. Place in warm area until doubled, about 45 minutes. Brush top of rolls with egg wash (egg beat with a little water) if you wish and bake at 375 degrees for 15 - 18 minutes or until lightly browned on top. If you choose to make the rolls larger, you will need to bake them longer. Remove rolls from muffin tins and cool on rack. I store mine in the refrigerator or in the freezer.

Enjoy!


Monday, November 21, 2011

Fun Idea for Thanksgiving

Remember how easy it is to make meringue cookies? Add a little food coloring and you can make some fun pumpkins for an attractive table place setting or for a dessert platter.

Just make the meringue cookie recipe (skip the chocolate part), beat in a little food color at the end (paste is better than liquid for this) and use a cake decorating set or a zip baggie with the corner cut out. I used a cake decorating bag without a tip for the pumpkin part by making vertical curves/lines like the curves on a real pumpkin. A round tip was used for the stem and vines and I added leaves with a leaf tip.

Make as big a batch as you wish. Remember the basic porportion of 1/4 c. sugar, 1 egg white and 1/8 t. cream of tarter.

Mine ended up to be about 2 1/2 inches wide. Since these are a little bigger of a cookie, set oven on 225 degrees F and leave in the oven a little longer to dry out.

Have fun creating!


Friday, November 18, 2011

Gluten-Free Thyme Rolls for Thanksgiving Trial #2

Thanksgiving is a few days away. Planning a meal for a large group can be stressful if one or more have food sensitivities. I remember last year felt much harder. I didn't want anyone to feel left out especially a kid. It does require some planning especially if you are going to someone else's home.

I have always loved to bake especially making yeast products. I enjoy the challenge of baking gluten-free, but gluten-free baking with yeast is trickier. I became frustrated with it early summer and bought my bread for a while. Here we are at Thanksgiving and I decided I really wanted home baked thyme dinner rolls.

I was tired of putting in lots of eggs and water and decided I wanted my rolls to have a round shape without a mold. So, I looked up recipes and tried a combination of flours I thought my family would like. The dough was stiff, but it didn't raise well. Neither did trial #2. On the upside, the flavor was great and my kids loved them warmed with honey.

A work in progress


I am still trying to get my rolls to have a shape without a mold while having them be light inside with a flavor and texture my family likes. Three days to Thanksgiving.....


Wednesday, November 16, 2011

Pan Fried Butternut Squash


Butternut squash seed cavity -- a perfect heart!
 I have always loved butternut squash. I grew up on a farm where we had a huge garden. We prepared our squash simply by cutting it into wedges after taking the seeds out and baking it  for an hour in a casserole dish, covered, with a little water in the bottom. I still do that sometimes. 350 degrees seems to work. But I have found that the microwave works also for 15 to 20 minutes and turning it halfway through. You just can't make as much at one time. I like to freeze leftovers.
After it is cooled a little, it's so easy to scrape out of the shell and just smash with a fork. I still like mine with salt and pepper, but the rest of my family likes brown sugar and pumpkin pie spice in theirs. We started growing butternut squash last year and tried to think of other ways to use it. I know my mom used to bake with it - pies and bars. It is similar to pumpkin.

We heard that peeling, cubing, and roasting it was good. Since then, we have fried it in a pan and roasted it in the oven at about 425 degrees F. This is my husbands favorite way to eat the squash. It does get kind of soft in the oven. Broiling it may work better. We haven't tried that yet. Our favorite is in a skillet at a high temperature, so it browns without getting too soft too quickly. Check it out. It's simple with olive oil and crushed tyme. Although this recipe is easy to change for how much it makes, it does work better when there is only one layer of squash in the skillet.

Pan Fried Butternut Squash          
2 T. olive oil
1 1/2 t. crushed dried rosemary
1/2 t. salt
pepper to taste
6 c. butternut squash, cubed and peeled

Pour 1/2 T. of olive oil in the skillet and turn the stove to high. Mix the rest of the ingredients in a bowl and pour mixture into the pan. Be cautious with the high temperature. Turn squash occasionally when it starts to brown. Flip gently scraping under the squash to avoid tearing the pieces. Cook until browned and softened but firm, about 15 minutes.

My mother always makes it the traditional way for Thanksgiving because that's the way her grandchildren like it, but here is another option for a tasty vegetable for the Thanksgiving table.


Wednesday, November 9, 2011

Quinoa Chicken Soup With Gluten-Free Dumplings

We're having another cold fall day where a bowl of soup sounds perfect for lunch (or dinner). Soup is definitely a comfort food for me. And since I really enjoy both the taste and nutritional benefit of quinoa, I tried it in my favorite soup. You could use rice instead, but I've gotten so used to it this way, I couldn't imagine eating it the way it was before with the rice. This is a light, yet filling soup. Make it more hearty by adding dumplings or extra meat and quinoa.

Quinoa Chicken Soup With Dumplings                 print recipe

1 T. olive oil
1/2 c. chopped onion
3/4 c. chopped celery
5 c. chicken broth
1 1/2 c. chopped carrot
2 t. tarragon
1 1/2  - 2 c. cooked quinoa
1 - 1 1/2 c. diced cooked chicken
2 1/2 T. cornstarch
2 1/2 T. water

dumpling batter, if desired


Heat olive oil in large soup pot on medium heat. Saute onion and celery for 5 minutes. Add broth, carrots, tarragon and quinoa. Bring to boil and simmer on low/medium for 15 minutes. Meanwhile, mix water and cornstarch together until dissolved, prepare chicken, and lastly, make dumpling batter, if desired.

Stir cornstarch liquid into hot broth. Add chicken. Simmer until chicken is heated through and serve, or make dumplings. To make dumplings, see linked recipe or use your own recipe. Drop dough by teaspoonfuls into hot soup and simmer on low for 20 minutes, keeping covered. Serve soup, but allow it to cool a little before eating. Serves 6-8.

Notes:  I like to make my broth from scratch. I usually end up with about 5 cups of broth, which is the reason for using 5 cups in the recipe. Adjust the recipe as needed with the amount of broth you have. I use my leftover quinoa, but you should be able to cook quinoa in the broth just like you can rice. I would simmer it at least twice as long.

Enjoy!

Tuesday, November 8, 2011

Simple and Fun Banana Snacks

     Finding after school snacks to please can be a challenge. These banana snacks are fun, creative, appetizing and nutritious, and the kids can make them by themselves.


Mimi Banana Sandwich Snacks                     print recipe                   
1 medium banana
2 T. peanut butter or other nut butter
honey or agave, if desired.
variety of toppings (dried fruit, nuts, crushed GF cereal or cookies,
     GF crisp rice cereal, dairy-free mini chocolate chips, coconut, etc.)

Mix sweetener into peanut butter if desired. Prepare toppings by chopping into smaller pieces as needed and place in small piles on a plate or tray.

Cut banana into 12 slices. Place 1 tsp. of peanut butter on six slices. Top with remaining 6 slices and push down until peanut butter squeezes out of the sides. Roll sides in toppings as desired. Serves one. Eat right away.

Pour remainder of toppings into a bowl. Add peanut butter and sweetener, as desired and stir until mixed and stiff. Roll into balls....or do it the messy way (with clean hands) and have fun mixing with your hands. Eat or refrigerate.


It's a snack that's fun to make and fun to eat.


Thursday, November 3, 2011

Simply Easy GF Apple Crisp

I to like to use fruit when I can for dessert since it has some nutritional value. Apple pie is delicious, but the crust takes some time to make. While you still have to peel, core and chop the apples, making a crisp is easier and still very tasty. You can load up on the apples and skip the bottom crust.

Depending on the kids ages, this can be a fun recipe to help out with. And you might find other desserts you want to sprinkle the topping on.

I like to use half firm apples and half soft cooking apples when I make the crisp to help make liquid but still have some firmer texture. I tried replacing half of the apples with frozen blueberries last night and it turned out great.


Gluten-Free Apple Crisp                     print recipe

Topping:
1/4 c. firmly packed brown sugar
1/2 t. ground cinnamon
1/2 c. plus 2 T. gluten-free oats or quinoa flakes
1/2 c. brown rice flour
1/2 t. zanthan gum
1/3 c. ghee, shortening, or canola oil

Filling:
6 medium apples (about 7 cups), cored, peeled and chopped
1/2 T. lemon juice
1/4 c. sugar
3/4 t. ground cinnamon
1 T. cornstarch

Lightly spray an 8 x 8 x 2 inch pan or 6 - 8 individual serving dishes (oven safe) with cooking spray. Preheat oven to 375 degrees.

Mix together all topping ingredients in a bowl before adding ghee, shortening or oil. Mix well with fork until crumbly.

Mix apples with lemon juice to coat all apples right after chopping. Mix sugar, cinnamon and cornstarch for filling in a small cup and pour over apples. Stir until all apples are coated. Pour into pan or dishes and spread evenly. Sprinkle topping over apples and bake at 375 degrees for about 25 to 35 minutes for individual serving dishes and 35 to 40 minutes for 8 x 8 inch pan or until topping is golden brown. Cool 10 minutes before serving.

Note:  Try different fruits. If the fruit is a little more sour or juicy, you made need to add a little sugar or cornstarch.

This recipe can be dairy-free if you use oil or shortening. If you are just concerned about casein or lactose and are not familiar with ghee see link for ghee.


Monday, October 31, 2011

Happy Halloween!

October 31st has arrived again. Seems to come a little faster each year. Halloween is a fun time in our house. Looks like we are going to have two vampires this year - a popular costume from what I can tell. Which reminds me, I still need to sew the capes.

Our school is participating in a great program this year. I had heard a little about it last year from a sister who lives in a different state. If the kids bring in their candy from trick or treating, they get their name in a raffle and the candy gets sent to the troops overseas. Ingenious for all kids to limit how much candy they eat but especially helpful to those kids with diet concerns. They can still have fun collecting and then give a lot of it away to the troops.

Have a fun day even if you are too old for trick or treating. Put a pumpkin face on a sandwich or a pancake and remember what it was like to be a kid.

Friday, October 28, 2011

Apple Raisin Stew with Spiced Dumplings

Every time I make homemade applesauce in my house, I can never seem to make enough. And then, last week when I was making dumplings, I thought...hmmm, what if I made a sweet spiced dumpling to go with my homemade applesauce. So, I'm combining the two for a fantastic warm finish to a meal. The jury is out in our house on which dried fruit to use -- cherries or raisins. The girls voted for cherries and the boys liked the raisins. You'll have to decide for yourself.

Raisin Apple Stew with Spiced Dumplings           print recipe

Apple stew
6 medium apples (3 soft, 3 firm)
1 1/4 c. water
1/2 t. lemon juice
2 T. agave or 3 T. sugar
3/4 t. cinnamon
1/3 c. raisins
     (or dried cherries, chopped)
1 T. cornstarch
1 T. water

Spiced Dumplings
1/2 c. brown rice flour
1/4 c. tapioca starch flour
1/4 c. brown sugar
1/2 t. zanthan gum
3/4 t. baking powder
1/2 t. cinnamon
1/4 t. allspice
1/4 t. nutmeg
1/8 t. ginger
1/8 t. salt
1/3 c. non-dairy milk
1 T.  canola oil

Wash, core, peel (if desired), and chop apples into 1/2 to 1 inch pieces. Combine all apple stew ingredients, except for the cornstarch and water, in a large saucepan. Bring to a boil and simmer while covered for 20- 30 minutes, stirring occasionally.

Mix together cornstarch and water in a small cup. Set aside. Towards the end of the above cooking time, make dumplings. In a small bowl, mix all dry ingredients together well. Make a well in the middle and add milk and oil. Stir together until just blended.

When the apples are cooked down enough to make a sauce, stir in cornstarch mixture stirring sauce thoroughly. Drop dumpling batter by tablespoonfuls in hot sauce. Cover and simmer on low/medium heat for 20 min.without lifting cover. Remove cover. Allow time for dessert to cool before eating.

Notes:  We chose not to peel the apples. The peels do separate from the apples. I used 3 Macintosh apples and 3 Granny Smith apples for a nice combination of flavors and textures. If you do not need gluten-free foods, use your favorite dumpling recipe and add the brown sugar and spices. 

Serves:  6


Wednesday, October 26, 2011

Halloween Fun with Meringue Cookies

The sweet, light crunch of meringue cookies brings back fond memories...different flavors and colors, mini chocolate chips, making them with my mother. We always made them in small drops of dough from a teaspoon.

My daughter loves meringue cookies, so this year we decided to make them in shapes, but skip the food coloring (there is already plenty of that used around Halloween) and use dark chocolate to decorate the cookies.

Although the cookie is mostly sugar, at least the egg whites offer a "little" protein. The cookie is dependent on the sugar for its structure, but I cut down on the sugar just a tablespoon or so. The cookies are light and low in calories if you keep them small.

Basic Meringue Cookies               print recipe

3 large egg whites
3/8 t. cream of tarter
scant 3/4 c. sugar
1/4 t. gluten-free vanilla or peppermint, if desired
1/4 c. of dairy-free chocolate chips
1/8 teaspoon of shortening

Beat egg whites on low to medium in a clean bowl until soft peaks form. Add sugar 1 tablespoon at a time beating on high until stiff peaks form and dough is glossy. Beat in flavoring in flavoring, if desired.

Drop by tablespoons full onto parchment lined cookie sheet 1 inch apart. Use an extra spoon to get the dough off of the first spoon. **To make shapes, fill a sturdy zip top quart bag and cut at least a 1/2 inch corner. Pipe shapes onto the parchment paper. We had tons of fun doing this! The egg whites felt strange and squishy in the bag. Bake at 200 degrees for 1 1/2 hours on middle rack. Rotate pan 1/2 turn after 45 minutes. Turn off oven, open the door a little and let cookies cool with the oven. Remove after 2-3 hours or until dried out. Peel off of paper, but leave on paper if you want to decorate them.

Melt chocolate chips in a microwave safe bowl in the microwave at 50% power in 30 minute increments until melted. Stir each time. Add shortening. Spoon chocolate into small zip top plastic bag and snip one corner to the desired size. Decorate cookies as desired. Store covered at room temperature after chocolate hardens.

Notes:  Our oven was a little too hot, so our cookies got a little brown. I prefer them to stay pale. Keeping the oven at 200 degrees should prevent the cookies from browning. Keep in mind if your cookies are bigger, they will take longer to dry out.

Remember that egg whites handle the best when you separate them when they are cold and whip them when they are at room temperature. Save the yolks for something else. Also, high humidity can make it harder to whip the egg whites well.

We made bats, bones, skeleton heads and spider webs. Kate was not sure what the middle cookie in the above picture was. We all guessed....a brain, a leaf, vomit (it is almost Halloween!). What does it look like to you?


Thursday, October 20, 2011

Potato Cauliflower Soup

     It's another cold and rainy fall day here. A nice bowl of hot soup sounds good about now. One of my favorite recipes is a vegetable soup that is very satisfying and comforting especially on dreary days. You can choose to use chicken broth, vegetable broth or just water. And vegetables are naturally gluten and dairy-free. No need to check those labels! Just simple, basic food.


Potato Cauliflower Soup          print recipe

1/2 T. olive oil
1 medium onion, chopped
2 cloves of garlic, minced
1-2 stalks of celery, finely chopped
2 c. gluten-free broth
2 c. water
3/4 - 1 head of cauliflower, trimmed and chopped
2 medium potatoes, peeled and chopped
2 t. tarragon or thyme
salt and pepper to taste

     Heat olive oil in medium sauce pan. Saute onion, garlic and celery for about 5 minutes on medium heat until translucent, stirring frequently. Add water and broth, cauliflower, potatoes, and desired herbs. Bring to boiling and simmer 45-60 minutes until vegetables are nice and tender.

     I use a potato masher to mash vegetables into small pieces or a hand blender to puree the soup. I enjoy it both ways. Be cautious as the soup is very hot. Use salt and pepper to taste. Sometimes I will add 1/2 c. of dairy-free, unsweetened milk to give it a little creaminess. Milk can be used also.

     Enjoy a bowl of hot, homemade soup today!


Wednesday, October 19, 2011

Simple and Easy Gluten-Free Dumplings

     Now that the cool weather is back, soup sounds soooooo good. And there's something very simple you can add to your favorite soup to make it extra delicious, even more of a comfort food - dumplings! I took my favorite dumpling recipe and converted it to gluten- free.

Simple Gluten-Free Dumplings          print recipe
3/4 c. brown rice flour
1/4 c. potato starch flour
1 1/2 t. baking powder
3/4 t. zanthan gum
1/2 t. salt
3/4 c. non-dairy milk
1 1/2 T. olive oil

     Mix all dry ingredients together well in a small bowl. Make an indentation in the flour mixture and pour milk and olive oil in it. Mix together until the lumps are gone. Dough will be wet. Let dough set for a few minutes until it thickens and will hold a shape.
     Drop by spoonfuls into a hot liquid such as soup or stew. Cover and simmer on low/medium for 12-15 minutes for small dumplings and 20 minutes for large dumplings. Recipe will make about 54 small or about 18 large ones.

Notes:
     Make dumplings small if you like them "gummy". Make them large and add 1/2 t. baking powder if you like them fluffier.
     If you want to add some flavor to the dumplings, try adding 1/2 t. of dried Italian herbs or 1 t. finely chopped fresh parsley along with 1/8 t. of onion powder and 1/4 t. garlic powder to the dry ingredients.
Or use your imagination and add other herbs and have fun.


Monday, October 17, 2011

Monday's Challenge

     We've had some beautiful days here, but the cold weather is on its way. The thought of making hot soup and warm baked goods always seems more enticing as the weather cools.

     But besides making the food I need for my family, it's fun to make something special for someone. I challenge you this week to make a surprise - a surprise treat for an unsuspecting recipient! Something fun...a favorite recipe for the family, a funny face on a pancake for a child (I love food art), a treat for a friend or neighbor...the list is endless. Be creative and have fun.

Wednesday, October 12, 2011

Energy Bars

     I'm always looking for ideas for quick healthy snacks especially for after school. If there are diet restrictions, it's even harder to come up with a variety that the kids and my husband will eat.
     A friend of mine mentioned finding an energy bar that her husband really enjoyed, so I checked it out. The recipe has a lot of flexibility to make it to your own tastes and my son really enjoys them (and he's always hungry).
     The recipe for Homemade Cliff Bars was from Enlightened Cooking. Yum! I had never tried Cliff bars, but my family loves a variety of snack bars. It's awesome to be able to make them myself and change up the ingredients to make them the way my family likes them. It is a very flexible recipe with lots of healthy ingredients. Just make sure you keep the ratio of dry to wet ingredients and replace ingredients with similar ones or the bars may be too sticky or dry.
     Jeanette's Healthy Living noted trying the recipe with quinoa flakes instead of quick-cooking oats. I had not tried quinoa flakes yet, but I like the nutrition in that seed. We tried it and it worked great.
     We chose dried cherries, peanut butter and toasted almonds for this recipe. I really like using rice syrup since it is lower in sugars than honey, but honey has its benefits, too.


Energy Bars                                                                               print recipe
Adapted from Enlightened Cooking

1 c. quinoa flakes or gluten-free quick-cooking oats
1 c. GF crisp rice cereal
1/4 c. ground flax seed, rice bran or a combination
1/2 c. chopped nuts or seeds or a combination
1/4 c. finely chopped dried fruit (fruit that is sticky works best)
1/2 c. nut butter, your choice
1/3 c. gluten-free rice syrup (no barley malt in it) or honey
1 t. gluten-free vanilla
1/2 t. cinnamon, if desired

     Mix all dry ingredients in a large bowl. Melt syrup and nut butter in a microwave safe bowl (45 - 60 sec.) or in a small pan on low heat on the stove top. Do not cook. Add vanilla.
     Pour nut butter over dry ingredients and mix really well. Pour into a lightly greased 8-inch square pan and press down firmly. Refrigerate until firm - about 1 hour.
     Cut into bars and wrap into individual servings, if desired. Keep in a sealed container in the refrigerator.
     Chocolate chips can be added in place of some of the nuts. The flavor combinations are limited only to your imagination. If you like a particular energy/snack bar, check the ingredients to see what flavors, nuts, fruits, spices, etc. that they use to get ideas.

     We tried melting 1/4 cup of chocolate chips in the microwave (30 sec. at a time on 50% power and stirring in between until melted) and adding it to the mixture right at the end. You can still use all of the other ingredients. They turned out great (see above picture). Remember to mix well.

     Have fun experimenting. What flavor combinations do you enjoy most?

Thursday, October 6, 2011

Easy Homemade Gluten-Free Pancakes

My son loves pancakes for breakfast. Though there are mixes on the market, making your own is really easy. Besides being cheaper, you can change the flours and flavors from time to time. And they turn out light and fluffy just like wheat based pancakes.


Easy Homemade Gluten-Free Pancakes                print recipe

3/4 c. brown rice flour
1/2 c. sorghum, buckwheat or quinoa flour
1/4 c. tapioca starch flour
2 T. brown sugar
2/3 t. zanthan gum
3 t. baking powder
1/4 t. salt
1 t. cinnamon, if desired

2 eggs
1 c. non-dairy milk
1/2 c. water
2 T. olive oil
1 1/2 t. vanilla

Measure first eight ingredients and whisk together in a small bowl

Whisk eggs until creamy and blended in a separate bowl. Mix in milk, water, oil and vanilla. Stir in dry ingredients until just blended. Let dough rest for 5 minutes.

Meanwhile, heat skillet on medium heat. Pour dough into desired size pancakes in greased skillet. Turn pancakes when they start to bubble on top. Fry until golden.

Be creative. Remember pancakes can be topped with many things besides syrup...melted jelly, nut butter/ bananas/honey, applesauce.... Have fun!

Tuesday, October 4, 2011

Simply Fun and Easy Shakes

Whether it's warm and sunny or chilly, shakes are fun to make and fun to eat. By putting in frozen fruit instead of ice cream, you can still have a thick satisfying shake with less calories and without the dairy. We particularly like the flavor of almond milk with ours, but any nondairy milk that you enjoy or juice will work. Banana really adds a creamy texture the kids enjoy. We use frozen fruit and skip the ice cubes used in some shakes to make it fruitier. We use a variety of fruits but this is one way the chefs from Gluten-Free Kitchen Fun like their shakes.

Fruit Smoothie          Print Recipe

1 medium banana
1c. frozen strawberries
1c. frozen blueberries
1 1/3 c. almond milk, nondairy milk or juice
1 t. gluten-free vanilla
1 T. honey or agave

Blend all ingredients until smooth. Serves two hungry children after school.

Monday, October 3, 2011

Monday's Challenge

     October has arrived. The trees are turning stunning shades of gold, orange and red. Even though fall is in the air, temperatures are expected to reach the 70's this week. I'm looking forward to it.
     One of the things I like to do is take an old recipe I love and change it to my current lifestyle. Removing foods from the diet or making recipes healthier doesn't mean you have to go without.
     Are you missing a food item that you used to really enjoy and can't or shouldn't have now? I challenge you this week to take a favorite recipe and use gluten free flour (don't forget the zanthan gum) or nondairy milk, or try it with less fat and sugar. Sometimes when you change a recipe it even turns out better than the original recipe.
     Have fun experimenting!


Note:  See "What Do You Eat?" for information on working with banana and pumpkin in sweet bread. Zanthan gum is probably not needed. (added 10/4/11)

Friday, September 30, 2011

Friday's Quote to Ponder

"I am not afraid of storms for I am learning how to sail my ship."
                                                                   -Louisa May Alcott


What a great visual picture of conquering the stresses of life...a sailboat heading into a storm. You can do it if you learn how to adjust the sails.

Thursday, September 29, 2011

Brownies With a Secret

     Brownies for dinner? Can you imagine answering the famous question "What's for dinner?' with "Brownies!" I can see the smiles now.

     While that may be inappropriate, I wanted a healthier way of making brownies. I learned from various sources that using black beans in brownies was a great way to sneak in nutrition and keep the texture of the brownie. How clever, I thought. Beans are full of protein and fiber. I hate that empty feeling you get when you eat a snack that is mostly refined flour and sugar.

      By putting beans in my gluten-free brownie recipe instead of starch flour, I add protein and fiber and make a complete protein with the brown rice......and nobody has to know!!! Though the recipe still has fat, sugar and chocolate, it has some nutrition, too. I have served it to my kids and their friends for after school snacks and heard the ultimate compliment, "May I have another?"

Black Bean Brownies               print recipe

4 eggs
2 t. vanilla
1 1/2 c. rinsed black beans
1/2 c. soft ghee, canola oil or
         dairy-free margarine
         (softened)
1 c. brown rice flour
3/4 c. cocoa
2 c. sugar
1/1/4 t. zanthan gun
3/4 t. baking powder

Preheat oven to 350 degrees F. Grease  one 9 x 13 inch pan (for thicker brownies) or two 8 x 8 inch pans (for thinner brownies).

Blend beans, vanilla and eggs in blender or food processor until smooth. I use a hand blender.

Measure all dry ingredients into medium mixing bowl and whisk until well blended. Add ghee, oil or margarine and blended beans. Mix just until blended.

Pour into pan(s) and spread until even. Bake 25 - 30 minutes for small pans and 30 - 35 minutes for large pan or until toothpick inserted in center comes out fairly clean. Cool on rack. Dust with powder sugar, if desired. Cut and store in airtight container in refrigerator for 1 - 2 days or freezer for 3 months.

This recipe can be dairy-free if you use oil or dairy-free margarine. If you are just concerned about casein or lactose and are not familar with ghee see link for ghee (added 11/3/11).

Perfect treat for snacks, school lunches and family gatherings. Yum!

Wednesday, September 28, 2011

What is Ghee?

     Ghee (pronounced with a hard "g"), also known as clarified butter and drawn butter, is unsalted butter that has been boiled, removing the moisture and strained to remove the cooked milk solids. The remaining golden fluid is butter oil. Without the moisture and milk solids, it keeps at room temperature at least one month and can be used to saute at high temperatures. I like to combine it with olive oil when I saute. The two make a great flavor combination.

     Clarified butter is commonly used for cooking in South Asia. It is semi-soft at room temperature and hard with refrigeration. It has a wonderful aroma and intense flavor. Since it is oil, just a little is all you need. My son came home from Cub Scouts one evening after I had made ghee. The kitchen smelled so good his face lit up and he said, "Did you make cookies?"

     French ghee is only partially clarified. Ghee used in Indian cooking is fully clarified. When fully clarified, the casein and lactose have bee removed. However, trace may remain. It is up to you to decide if this food will work for you. We have chosen to use it on a limited basis. I have grown to really enjoy ghee and have learned to bake with it. Ghee can be purchased or made at home.

Tuesday, September 27, 2011

Simply Fruity Gelatin

     I like to make foods as natural as possible for my kids. My friend made a gelatin salad that had applesauce and berries in it. The gelatin was the boxed type with artificial flavors and colors, but the salad had a great texture. So, I tried it with unflavored gelatin and fruit juice and came up with the following recipe. The kids love it somewhat frozen, too.

Simply Fruity Gelatin             Print Recipe

1 envelope (.25 oz.) of unflavored gelatin
1 3/4 c. 100% fruit juice of choice
1-2 T. sugar, if desired
1/1/2 c. frozen blackberries
1/2 c. applesauce, unsweetened

Sprinkle gelatin over 1 c. of cold juice in a medium bowl.

Bring the rest of the juice (3/4 c.) just to boiling in a small saucepan. Stir in sugar (if desired) until dissolved.

Pour hot juice into cold juice and mix until well gelatin is dissolved (2-3 minutes). Stir in applesauce and frozen berries. Pour into bowl and refrigerate until set, about 2-3 hours.

Notes:  Adding sugar is not really necessary, but if your kids are used to the boxed gelatin, you may want to start with a little added sugar until they are used to the change. The frozen berries will help the gelatin set up, but if you are in a hurry, put it in the freezer. My kids love it when it gets a little icy!  It's an easy recipe for them to help make, too.

Enjoy!

Monday, September 26, 2011

Monday's Challenge

      Happy Monday! It's a dark and rainy morning, but the weather report promises that the week will transform into sunny and decent.

     Which reminds me that we are still in a season of nice walking weather. My days get busy with kids and commitments, and there never seems to be enough time to exercise. Walking is one of the easiest forms of exercise to do.

     Whether you park your car a little further from the store, do a couple of extra flights of stairs or take walks in your neighborhood, I challenge you to fit a little extra simple exercise into your week. Feel good.

Friday, September 23, 2011

Friday's Quote to Ponder

"Start by doing what is necessary; then do what's possible; and suddenly you are doing the impossible."   -St. Francis of Assisi
                                                                                                                   
     I consider myself an optimistic person, but I have to admit that some days life's challenges feel overwhelming - like I can't accomplish them. That's when I step back and say to myself what do I really need to accomplish today, and focus on smaller parts of the end goal. Just like the quote says, before I know it I'm getting more pieces done and then what didn't look feasible has been accomplished.
     When I first tried to figure out how I was going to be able to provide a gluten-free, dairy-free diet for my family, it felt impossible. But, over a year later it feels much different. I'm actually having fun with it and we are thriving because of it.
     So, whether you are trying to adapt to food sensitivities/allergies, trying to loose weight or trying to be healthier and it just doesn't seem possible, set smaller goals and before you know it, you'll be doing what you thought you couldn't.

Thursday, September 22, 2011

Cherry Chocolate Zucchini Muffins

     As the days become shorter and cooler, the garden is becoming empty. Though the garden isn't completely harvested, zucchini season is over here. I finished using my last zucchini I had stored in the refrigerator this week. 
     As I pull one my of my zucchini muffins out of the freezer, I am reminded of warm summer days and bountiful harvests.This recipe is my favorite one from last summer. It's light and moist with a wonderful blend of flavors.

Cherry Chocolate Zucchini Muffins  
print recipe

3 eggs
1/14 c. sugar
3/4 c. oil
1 1/2 t. vanilla
2 c. grated zucchini (unpeeled)
1/14 c. brown rice flour
1/2 c. potato starch
1/4 c. tapioca starch
1 1/4 t. zanthan gum
1 t. baking soda
1/2 t. salt
1 t. cinnamon
6 T. cocoa, sifted
1/2 c. chocolate chips
1/2 c. coarsely chopped dried cherries

     Preheat oven to 350 degrees. Grease or place papers in 2-12 count muffin pans.
     Mix flours, zanthan gum, baking soda, salt, cinnamon and cocoa well in a small bowl.
     Whisk eggs in a separate bowl until blended. Whisk in sugar, then oil and vanilla until well blended. Stir in zucchini. Combine flour mixture together with egg mixture just until blended. Fold in chips and cherries.
     Fill the 24 muffin cups about 2/3 way full. Bake at 350 degrees for 15-20 minutes or until toothpick comes out clean. Remove from pan and cool on wire rack.
     Keeps well in refrigerator for 1-2 days or in freezer for 3 months in an airtight container.

Tips: 
     Mix chopped cherries with 1 t. of the rice flour before putting them in the batter so they don't stick together.
     If desired, save the chocolate chips until after batter is in muffin pan. Place 5-6 chips in the center of each unbaked muffin. Then, push chips into center of batter using your finger or end of wooden spoon. You will have a chocolaty center when your muffin is warm.

     Have fun and enjoy!

Wednesday, September 21, 2011

Too Many Flours

     I remember getting started with gluten-free baking. I've always loved baking, but gluten-free baking was a bit overwhelming. Not only did the dough not hold together the same, there seemed to be a  lot of choices for flour. I was concerned with both nutrition and getting my kids to eat it.

     After trying different flours and mixes and reading labels, I found that rice flour, potato starch and tapioca starch are common flours used and produce a taste and texture close to that of wheat flour products increasing the chances of it being accepted by those who need to change their diet. A flour blend of 3 parts grain (like rice) and 2 parts starch is a general rule that seems to work in creating flour blends. The Bette Hagman's flour mix requires 2 parts rice flour, 2/3 part potato starch and 1/3 tapioca starch. I have substituted this flour for wheat flour at a 1:1 ratio in some of my favorite recipes with good success. Remember the xanthan gum-see below.

     This is a good place to start, trying new flours a little at a time. There are many flours to choose from with many nutritional benefits. A bean flour combined with rice flour makes a complete protein.

      I like to use brown rice flour for increased protein and fiber compared to white rice flour. White rice flour does work nicely for treats like a lighter cake or sugar cookies. I also try to reduce the starch when I can since it does not have any protein or fiber in it.

      Of course there are flour blends and baking mixes already prepared for you, but it is usually cheaper to make them yourself. It is very easy to make the Bette Hagman or other flour blends ahead of time so you are ready to go. Your favorite baked goods can easily be prepared ahead of time by getting the dry ingredients ready.

     If you are going to try converting a recipe over to gluten-free, don't forget the zanthan gun. Zanthan gum is a dry powder that replaces the gluten or "glue" that holds wheat flour together in the finished product. Check for guidelines for usage on the package. Some recipes don't need zanthan gum. For example, banana or pumpkin can provide the "stickiness" in a recipe if there is enough of it.

     Look in health food stores or health food sections in grocery stores for gluten-free flours and blends and for zanthan gum.

Tuesday, September 20, 2011

Tomato Basil Soup

     The tomato season has peaked where I live in the Midwest, although I still have a number of tomatoes in the garden. As I stared at a large box of tomatoes last week wondering what to do with them, I was stumped. I am the main tomato eater in the family and I still had some in the freezer from last year. I don't really like to can. Why we planted so many tomatoes is another story. Then my husband had a great idea. Tomato soup. I hadn't found a gluten-free version in the store yet. So, I researched for ideas and created the following recipe. My son and I ate most of it and he even requested it for his lunch bag for school.


Tomato Basil Soup                 print recipe

4 c. chopped fresh tomatoes
1 small onion
1/1/2 c. chicken broth
1 1/2 T. ghee or  2 T. dairy-free margarine
3 T. potato flour (not starch) or rice flour
1/2 T. dried basil
4 t. sugar
1 t. salt
1 t. lemon juice

     Combine tomatoes, onion and chicken broth in a large saucepan and bring to a boil. Simmer on low for 30 minutes. Remove from the heat and work tomato mixture through a food mill or mesh strainer to remove seeds and skin. In empty saucepan, melt ghee or margarine, stir in flour and cook 1 minute on low, stirring. Whisk 1/2 c. tomato mixture into the flour mixture until smooth. Whisk in the remaining tomato. Add remaining ingredients and simmer for 5 minutes. Add more sugar or salt to taste if needed.

     I ended up making several batches of soup and freezing it. I hope to get a couple more done before the end of the season. Soup is such a perfect food for the upcoming chilly weather. Warms the heart and soul!

Note: Tried brown sugar instead of white sugar - delicious! (added 9/26)

This recipe can be dairy-free if you use dairy-free margarine. If you are just concerned about casein or lactose and are not familar with ghee see link for ghee. (added 11/3/11)

Monday, September 19, 2011

The Complexity of Health

     On the first day of school this year, my daughter and I spotted little spider webs in the grass walking to the playground where the students lined up to go in. The webs were sparkly with the morning dew. She though they were so cool and wanted me to take a picture of them. I happened to have my camera in the car and attempted to capture natures beauty in a picture.

     You have to look close, but you can see the delicate web weaving in the blades of the grass. It reminded me of how intricate our own health is.
    There are many areas to address when dealing with our health. This blog focuses on diet. And dealing with allergies or sensitivities, weight concerns or just trying to eat healthy  in today's world can feel all consuming.

     But I still challenge you this week to consider other areas of your life that affect your health and how you feel. How will you handle them as you build your web of health?

Monday, July 11, 2011

Crazy For Quinoa

quinoa seeds
One of my favorite new foods I've learned about since being introduced to a gluten-free diet is quinoa (pronounced KEEN-wah). Though grain-like in appearance quinoa is actually a seed from a relative of the spinach plant. This ancient "grain" was valued historically by the Incas for improving the endurance of their warriors and is cultivated in the Andes Mountains.
I love its creamy/crunchy texture and slightly nutty flavor. Most of all, I love the fact that quinoa is a complete protein since I'm not a big meat eater. It not only has all of the essential amino acids but is high in the amino acid lysine, which we need for tissue growth and repair. This superfood contains many other nutrients including iron, fiber and B vitamins.

The bitter coating, saponin, is usually removed before we buy quinoa in this country. Rinsing it well is still recommended before cooking it to remove any residue. Remember to use a fine strainer.


Cooked quinoa
 
It's really easy to cook quinoa. Just bring 2 parts liquid and 1 part quinoa to boiling with a little salt, then simmer 15 minutes covered. The seed will enlarge and the germ will spiral out to form a tail. Remove from heat and let steam for 5 minutes. Fluff and serve with seasoning as desired. The seeds can be toasted in a dry pan for 5 minutes before boiling if you desire a roasted flavor.

Make a simple pilaf. Saute 1/2 to 3/4 cup of chopped veggies of your choice (celery, carrots, onion, pepper, garlic) in1 T. olive oil. Add 2 cups broth and 1 cup quinoa and cook as above.

Quinoa can be expensive but expands a lot with cooking. Look around for a good deal at health food stores and large supermarkets. I found quinoa at a Costco store at a very economical price. I do have to buy a 4 pound bag, but it stores well in a dry, cool place and it's easy to use. It can be substituted for most grains but especially for rice and couscous in many recipes. Make a big batch and store in the refrigerator to use as needed. Have fun trying something new and healthy.

What creative uses for quinoa have you found?